Nearly every RV on the road or boat on the water is made from fiberglass…for good reason. Fiberglass RVs and boats are easier to make in limited production than wooden or metal vehicles. They also weigh less, last very long and are quite durable. So just how do you take care of them, maintain their looks and make the finish last? This page will describe how to maintain fiberglass and why these vehicles become dull and faded. Also examined here are the processes used to correct common problems caused by oxidation.

Fiberglass is just what the name sounds like…very tiny fibers of glass. Glass is one of the world’s oldest and most available materials. Fiberglass was first created by accident in 1932 by a young Owens-Illinois researcher named Dale Kleist. He was working to attempt to weld together architectural glass blocks to form a vacuum-tight seal. A jet of compressed air accidentally struck a stream of molten glass he was working with resulting in fine glass fibers. Mr. Kleist then refined the process to utilize steam instead of air. Steam is cheaper, he reasoned, and would produce a finer fiber. Kleist was correct. The result was a glass fiber material thin enough to be used as a commercial insulation.
Fiberglass should be maintained on a regular basis. So just how regular is regular? In order to answer that question we have to ask what kind of exposure to the elements the vehicle receives. If the vehicle is kept dry and inside a garage away from the elements, then exposure is minimal and the fiberglass can be maintained about every 6 months or so with great results. However, if the vehicle is kept out in the elements under constant exposure, then regular maintenance should be done every 3 months without fail. Without regular care and maintenance, fiberglass will begin to show signs of oxidizing in 4 to 12 months.
Choose a wax suitable for fiberglass, like Protect All, Polish, Wax and Treatment with UV Protectant. Regardless of the product you select, be sure to follow the application instructions to ensure that you get the best results and all the benefits that the product has to offer. Be sure to apply the products using the regular intervals suggested above.
For larger vehicles you may decide to develop an application schedule. This will help reduce the amount of effort spent caring for the vehicle at any one time. Mentally divide the vehicle into three workable areas. In the case of a motorhome, this would be: 1) the driver side, 2) the passenger side, 3) the front and back ends, or caps.
Treat the whole vehicle to begin the process. Next month select the side of the vehicle that receives the most sun and exposure to the elements. This will be side one and will be the first side treated during each cycle. In the second month treat the area of the vehicle selected as side 2 and follow with side three one month later.
In this manner your fiberglass vehicle will be cared for once every three months with a minimal amount of effort. In between regular treatments each month, you may want to check areas of the vehicle that are exposed to contaminants from the road or moisture in the air. These would be areas like lower parts of a motorhome that are close to the road. You may also want to check the front cap. On a boat these would be areas that are horizontal on the topside and vertical areas close to the water line.
For RVs and boats that have been oxidized and have some fading or dullness, waxes and polishes may seem to restore the shine, but often don’t maintain it for more than a month or so. This is because the gelcoat surface has microscopic pits and crevices in it from oxidation. Waxes cover the surface and provide a barrier between the elements and the gelcoat surface. Waxes work well for vehicles in good condition, but not so well for older vehicles which have weathered a bit. After awhile, the wax wears off and the elements oxidize the surface of the gelcoat. This is similar to how rust occurs on steel or iron, or fading on older car paints. The result is a faded or dull appearance. You can remove the oxidation and then reapply wax.
Polish products are similar to waxes but they may also contain a small amount of abrasive that rubs off some of the oxidation and can restore some shine to the surface. These products work best for vehicles that have slight to moderate oxidization. Polishing compounds are a similar product which have more abrasives and can remove heavier oxidation but do not provide any protection afterwards, so you need to apply some protective coating after cleaning (preferably a wax so the process doesn’t begin again).
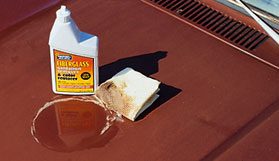
There really isn’t any secret to cleaning moderately faded or dull fiberglass, you just need some elbow grease and something to remove the oxidation such as a polishing compound or other accepted liquid abrasive. The application varies for different products, but in general you need to rub the surface with the oxidation remover or polishing compound to remove the oxidized layer. You then let the product dry to a haze and buff it off to reveal the clean shiny surface. This may require two or three different steps depending on the product or products that are selected to do the task. The surface should then be protected with a regular application of wax or polish. For moderate oxidation, we suggest Protect All Fiberglass Oxidation Remover and Color Restorer. Uniquely, it is a one step product that removes the oxidation with a mild abrasive and leaves a protective finish on the surface all in one process.
Older fiberglass often oxidizes to an extreme. No matter what is used for polishing the surface, it still looks dull. The first question is — Is the surface truly dull and will not shine, no matter what is used…even professional products? If so, then read section #1. In some cases owners have even reported seeing small fibers at the surface. After a long conversation with experts in the field of fiberglass technology, we have a little bit of extra information that will prove helpful. For fibers at the surface…we know that you can see what looks like a fiber or strand of fiber coming to the surface. However, what we need to determine is if the fiber can actually be grabbed with tweezers and pulled away from the glass. If the answer is yes, then following section #2 will provide the steps needed to correct the situation. If the fiber will not pull away from the glass then read the section of this article marked #3.
The information below is provided so that you can become familiar with the process that should take place to correct the problem. It should not be taken as instruction. There are far too many variables in the process. If you are still unsure how to proceed after reading this information, please seek professional advice or call our office. You may also contact us by Email.
1. If the fiberglass is faded and will not shine even after using professional grade products, you will need to do a wet sanding. (Professional grade products are those products found only at paint and body supply stores.) If you are not familiar with wet sanding it is suggested that you take the vehicle to a good body shop. Wet sanding or blocking takes time, patience and a lot of attention to detail. Sanding paper with grits in the 600 — 2000 or higher ranges are soaked for a 24 hour time period. Following the manufacturer’s instructions, the paper is placed on a foam block and the sanding begins. Once the sanding sequence is complete and the surface is smooth to the touch it will then need to be polished. Using a professional grade super duty polishing compound purchased from a professional automotive paint supply store and a speed buffer the surface is buffed free of scratches. Most professional polishing products suggest a 3 or 4 step sequence to obtain the best finish. Be sure to read and follow all manufacturer instructions for best results. Again, do not be afraid to take this task to a good body shop. This is not a task for the amateur or faint of heart.
2. If you have succeeded in pulling the fiber away from the gelcoat then you have an erosion problem. Though uncommon, it does happen. Most of the time it occurs on very old vehicles. The correction for the problem is a choice of two things. First, you can take the vehicle to a body shop and have them paint the surface after a thorough preparation. Or, you may choose to have the surface re-gelcoated. This process takes about the same amount of time as painting does and is about the same in price. The product recommended to us for the task is called PRESTEC, manufactured by Simtec Coatings. A good paint and body shop that does re-coating will be familiar with this product. If more information on the product is needed, call our 800 number or e-mail us and we will be happy to help. Remember, it is better to seek out a tradesman familiar with the process and this product or similar products, to get the best result. Re-gelcoating will last longer than a typical paint and is therefore a better choice.
3. If you can not pull the fiber away from the gelcoat, then you have a different situation called printing or imprinting. The situation happens when the fiber is thick enough to make an impression on the surface during the lay-up phase of production. This kind of thing does happen though it is an irregularity. The fix is a simple one that requires more time and effort than money. What you will need to do is a process called Blocking and Color Sanding. It requires Wet & Dry Sandpaper and a sanding block with a padded backing. Please use the suggestions found in section #1. Here again, it would be a good idea to stress that you may want to consult a good body shop and obtain their input on exactly how to proceed.
Under no circumstance should the above information be taken as definitive cause and solution. If you are not sure about what your specific problems are, please do not hesitate to consult a professional detailer or paint and body shop. Also, get references before you pay for any service or repair.